Blogging with Github Pages
28 Nov 2018 - Sanjeev
This blog captures my jots on how I built this site.
- Configure Godaddy DNS entries
- Configure Github Pages for custom domain
- Site to support https
- Have a simple mechanism for posting new blogs
- Limitations
Configure Godaddy DNS entries
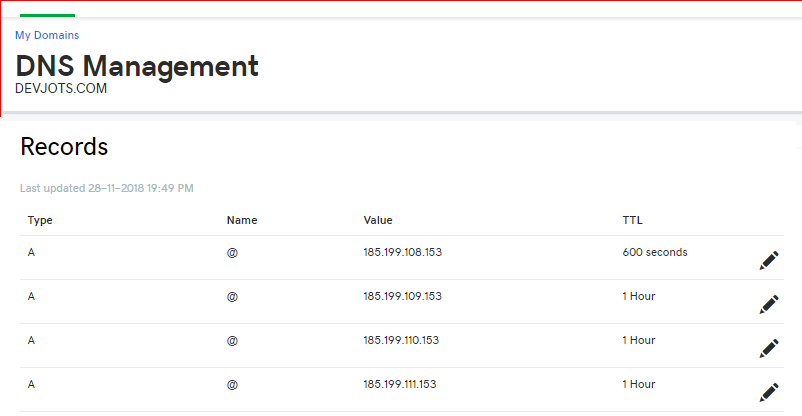
Once the custom domain is purchased, Navigate to the panel which allows to update the DNS entries for the domain. In this page, we need to add A record to point to our site or main domain. Optionally we can add CNAME record to point to www sub domain too. In the below screenshot, you would see both A and CNAME records. Refere documentaion @ Github Pages for any updated information.
Configure Github Pages for custom domain
- Assuming that you already have a Github login, create a repository where the site is going to be hosted.
- Create a text file with name CNAME having your custom domain name within it and push the changes to the repository. Below is the screenshot of my CNAME file. Bwlow is the screenshot of CNAME file
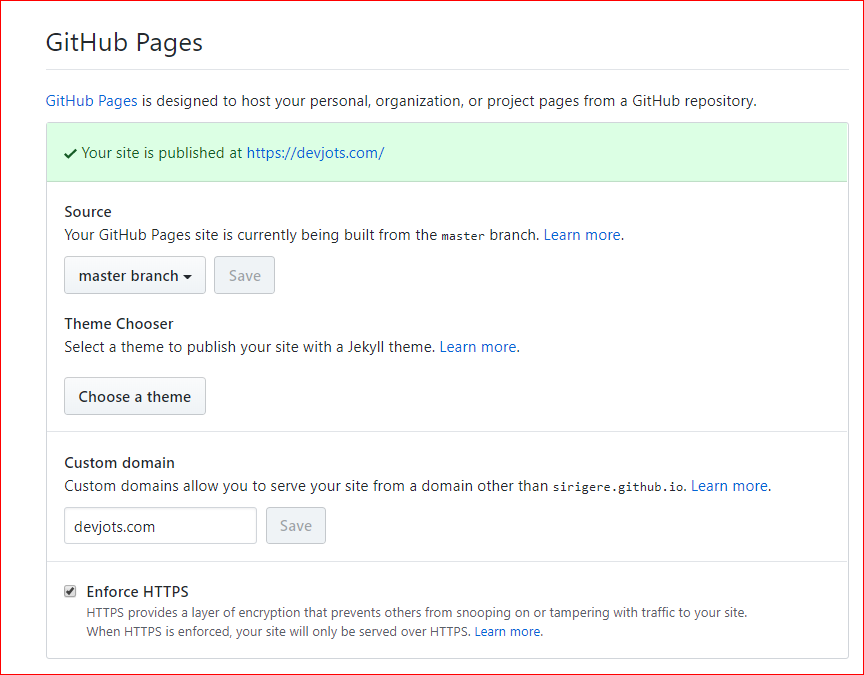
- Navigate to the repository > Settings > GitHub Pages section.
- Update Custom domain with the name of your custom domain. Below is the screehshot.
Refer to documentation for more details.
Site to support https
Out of the box, Github Pages work with Let’s Encrypt to provide free Domain Validation (DV) certificates. These cerificates are valid for 90 days. We should ask for a new certificates to renew the old one. This is automated through ACME protocol. Github does automatic renewal for you.
Have a simple mechanism for posting new blogs
As Github uses Jekyll. By default Jekyll is blog aware. With this, all I have to do is check in a new mark down file for posting a new blog. Refer to Pages for details.
- Adding a blog post is as simple as commiting a markdown page and pushing it to Github.
- Github Pages can only serve static pages. Github Pages use Ruby based Jekyll static site generator. Whenever you checkin, CI/CD pipeline starts a Jekyll based build to generate the static pages for your site. Below are some of the notes related to Jekyll.
- If you are a windows user like me, you would have to install Ruby on your machine to start with. This page guides you with steps to follow to install both Ruby and Jekyll.
- To build a site locally from command prompt, run command
jekyll build - To build and run a site locally from command prompt, run command
jekyll serve - This page provides step by step guide to get started on Jekyll
- This site overrides the Jekyll theme to use Bootstrap.
Limitations
Below are few limitations I felt worth noting and be aware of
- No HSTS header support. Refer issue 1249
- Site do not pass eligibality test for preloaded list as
- No HSTS header
- www subdomain does not support HTTPS
Do let me know if you have any clarification/suggestion on this post. I will be happy to know your feedback!


